Difference between revisions of "Annotation tables"
(→Sharing tables with other users) |
(→Sharing tables with other users) |
||
| Line 12: | Line 12: | ||
Start PgadminIII and connect to "services.flysafe.sara.nl". Then | Start PgadminIII and connect to "services.flysafe.sara.nl". Then | ||
| − | look in the server browser, which is the left pane in the window. | + | look in the server browser, which is the left pane in the window, as shown below. |
| + | |||
| + | [[File:Table_user_rights_1.png]] | ||
Look for the database "flysafe" and unfold the schema with your | Look for the database "flysafe" and unfold the schema with your | ||
| Line 24: | Line 26: | ||
example the table "test8" was right-clicked. | example the table "test8" was right-clicked. | ||
| − | + | [[File:Table_user_rights_2.png]] | |
| − | From the popup menu, select "Properties". A window will be shown | + | From the popup menu, select "Properties". A window like the one below will be shown |
with various options for the selected table. | with various options for the selected table. | ||
| Line 34: | Line 36: | ||
# Click the "Add/Change" button. The user with all privileges will appear in the small window on the top. | # Click the "Add/Change" button. The user with all privileges will appear in the small window on the top. | ||
# Click "Ok" to save the changes and close the window, or repeat the process to share the table with more users. | # Click "Ok" to save the changes and close the window, or repeat the process to share the table with more users. | ||
| + | |||
| + | [[File:Table_user_rights_3.png]] | ||
Revision as of 09:05, 10 October 2011
Contents
User annotation tables
Introduction
Creating table templates
Uploading tables
Sharing tables with other users
New tables are created in the user's own database schema and the owner will be the user who uploaded the table. By default, no other users can access the uploaded table. You can share your tables with other users using a database administration tool, such as PgAdminIII. The following example shows how to give another user read-only access to the recently uploaded table, so that the other user can read, but not edit the contents of the table.
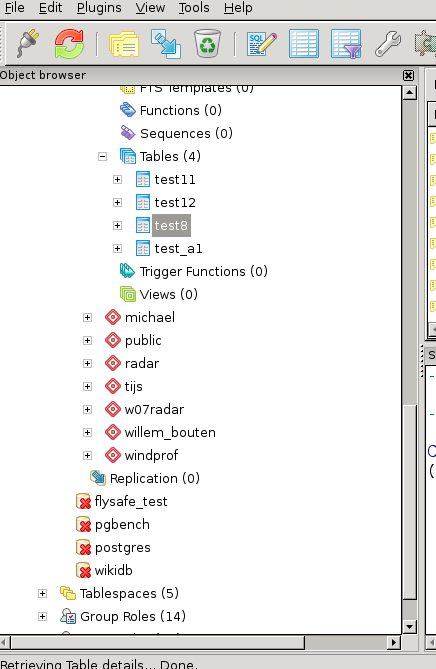
Start PgadminIII and connect to "services.flysafe.sara.nl". Then look in the server browser, which is the left pane in the window, as shown below.
Look for the database "flysafe" and unfold the schema with your login name and unfold the "tables" item in the tree. This will look like the following figure; all tables you upload will appear in this schema. In this example "test8" is a table that must be shared with other users.
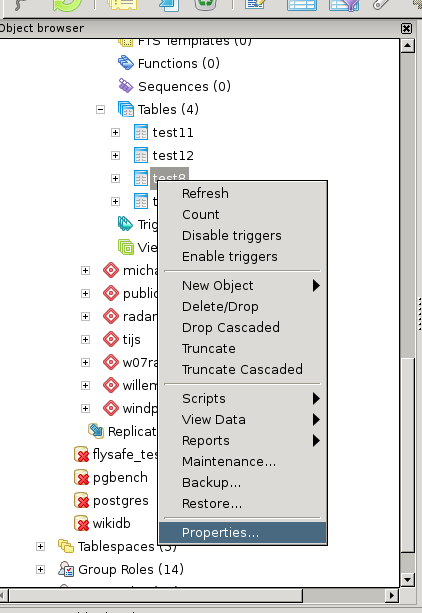
Right-click on the table that you want to share with other users. A menu will pop-up as shown in the following figure; in this example the table "test8" was right-clicked.
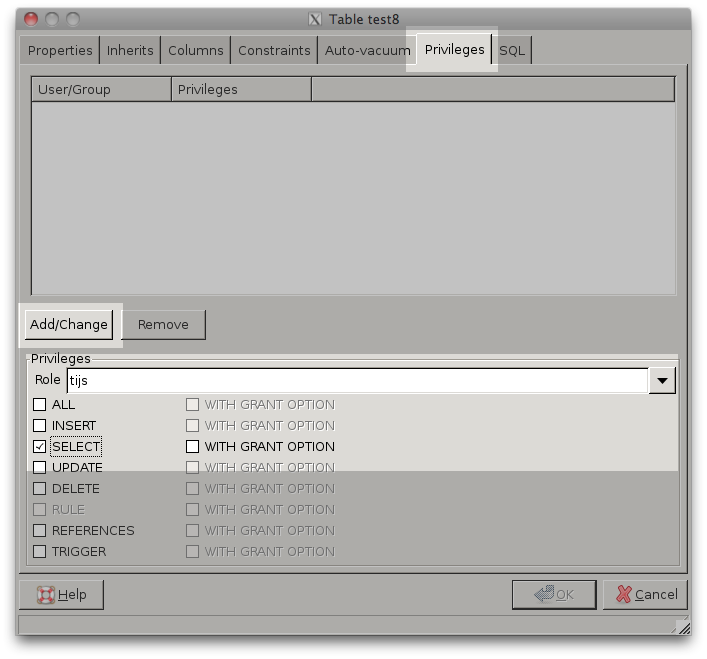
From the popup menu, select "Properties". A window like the one below will be shown with various options for the selected table.
- Select the tab "privileges"
- In the "role" field, select the user you want to share the table with; note: if you see only groups and no users, you have to change your PgadminIII preferences; this is described in showing login roles.
- Select the privileges you want to give this user on this table. To read a table, a user must have the "SELECT" privilege; to change contents, the user must also have the "UPDATE" privilege.
- Click the "Add/Change" button. The user with all privileges will appear in the small window on the top.
- Click "Ok" to save the changes and close the window, or repeat the process to share the table with more users.


