Annotation tables
Contents
User annotation tables
Introduction
In a highly database oriented environment with different types of users, some users prefer the possibility of uploading file-based data instead of interacting directly with the database.
For the creation of a new table, the automated system should know the number and type of columns in the uploaded file. This means that some sort of template must exist in the system before a table can be uploaded and inserted automatically. Since most users will typically upload more than one table with the same column names and types, a template has to be created only once and can be reused many times by the same user or by a group of users.
These pages describe the different components in the annotation service:
- the template management pages, for creating and modifying templates;
- the upload form, for uploading files into new database tables.
Furthermore, these pages describe how tables can be used and shared with other users.
Creating a new table template
To create a new table template, go to the page 'Templates', which shows an overview of existing templates. Follow the link called "Create a new template".
Before you can define the fields of the template, you must give the template a name and a description.
- Choose the name such that you can easily find it back.
- The description should be a description of what the template is for, not what the template will contain (as this will be visible when you define the columns). It has a mimimum of 40 characters.
You can start defining columns after you click on "Create template". This will also save the template name and description.
Defining and modifying template columns
Each column in a template definition tells the system which columns to create when you upload a new file into the database. So the names of the columns are used as table column names later on. This means that for each column:
- the name must be a valid table column name, that is, it must start with a letter and it must contain no spaces or special characters;
- the type must a valid database type;
- the checkbox "primary key" defines whether the column will be used as a primary key.
The primary key can be one column or a combination of columns. In a database table, the primary key field or combination of each table row must be unique. For the analysis of GPS tracks, a good combination would be the 'datetime' and the 'device_info_serial' fields. Every database table must have at least one column marked as a primary key.
To add a new template column, fill in the values on the last or only (and empty) row of the overview, then click on the button "Add column" next to it.
To modify existing columns, edit the fields of the columns, then click on "Update columns" below the overview.
To delete an existing column, click on the "Delete column" button next to the row.
Editing an existing template
If you want to edit an existing template:
- Go to the template overview page by selecting the "Templates" tab in the menu.
- Click on the "edit" link next to the template you want to edit. You can only edit your own templates.
- Edit the fields in the same way as when creating a new template.
Creating a database table by uploading a CSV file
In the current version, you can create database tables from CSV files. Before you can upload a file, you must have created a template in which each column corresponds with a column in your CSV file.
To upload a file into a new database table, go to the "Upload table" page in the Annotation management pages. This will show you an upload form.
First, select the file you want to upload by clikcing on the "browse" button.
Second, enter a name for the new database table. This must be a valid database table name, so it must start with a letter, contain no spaces or special characters, and be no longer than ? characters.
Then select the template which will be used for creating the new table. Currently, all templates from all owners are shown.
Finally, click the "Upload file" button. This will start uploading the file, create a new table from the specified template and import the data from the file into the new table.
If any error occurs during the importing of the contents of the file, the table is deleted again. The upload system will try to indicate where the error is in the file.
Annotating GPS track tables
Introduction
One of the purposes of uploading tables is to have some system to make personal annotations to GPS track data. It is not desirable to have personal annotations in the tracking data tables; instead, personal annotations should be stored in personal tables. Since users can have personal schemas, this is the logical place to put personal files. After creating the new tables, the annotations must be combined with the GPS track data.
CSV Files
The records that you want to upload must be stored in CSV (comma-separated value) files. The file must meet the following requirements:
- the first line of the file must contain the column names, separated with commas
- each next line must contain the data fields in the same order as the column names, separated with commas
- the column names must be unique
- spaces around column names and fields are always ignored
- in column names, there is no distinction between uppercase and lowercase.
Definition of the annotation tables
If a bird track must be annotated, there must be a way to idenfity records belonging to one particular bird track. The preferred way is to match the 'datetime' and the 'device_info_serial' fields, so annotation tables should have at least these two columns. This means that templates for annotation tables should have at least these two columns. It is also a good idea to make these fields primary keys, as this will speed up the joining later on. Your template will contain your annotation field too.
As a minimal example for adding a comment to a GPS track, a template should contain:
- a 'datetime' field of the type 'timestamp';
- a 'device_info_serial' field of the type 'integer';
- a 'comment' field, which in this example will be of the type 'text'.
Uploading the annotation file, joining the data
With the above example, suppose there is a very simple file with annotations for just two records. The file looks like this:
 "datetime","device_info_serial","comment"
 2011-05-21 12:10:45,533,"on nest"
 2011-05-21 12:25:42,533,"searching for food"
When this file is uploaded to the database, a new table is created. Suppose that this table is "user.annotation", the results can be combined in one query:
 SELECT     td.datetime, td.longitude, td.latitude, an.comment
 FROM       gps.uva_tracking_data td
 LEFT JOIN  user.annotation an
   ON       td.datetime            = an.datetime AND
            td.device_info_serial  = an.device_info_serial
 WHERE      device_info_serial = 533;
Sharing tables with other users
New tables are created in the user's own database schema. The owner will be the user who uploaded the table. By default, both your schema and the tables contained in the schema are only accessible by you. If you want to share data with other users, you need to:
- give other users the right to use your schema;
- access the tables in your schema.
You can give other users access to your schema and the tables contained in your schema using a database administration tool, such as PgAdminIII. The following example shows how to give another user the usage privilege to your schema. The second step shows how to give another user read-only access to the recently uploaded table, so that the other user can read the contents of the table. The contents are still protected, so they cannot be changed by other users.
Start PgadminIII and connect to "services.flysafe.sara.nl". Then look in the server browser.
To give other users access to your tables, you must first give the other users access to your schema.
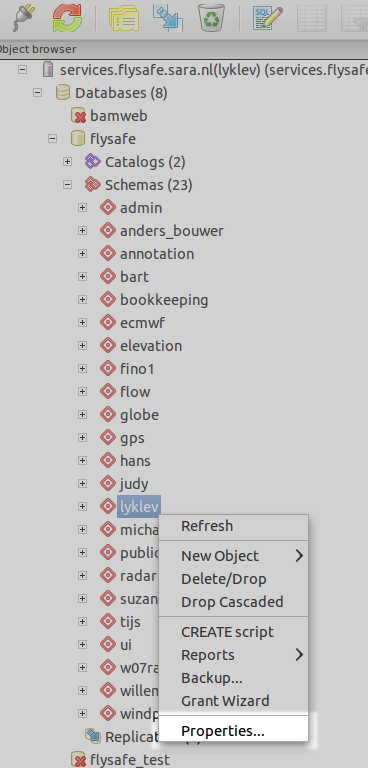
- In PgAdminIII look for the database "flysafe", open the "schemas" item and locate your own schema. This is the schema with the same name as your login name, "lyklev" in this example.
- Right-click the schema; a menu will appear, as shown.
- Click "Properties".
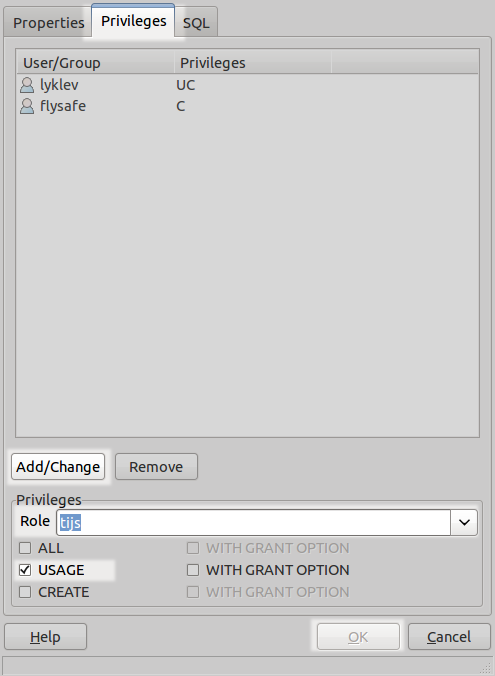
After you click "Properties", a dialog window will appear.
- Click the privileges tab (highlighted in the figure below).
- Select the user you want to give access to at the "Role" option. In this example, this is user "tijs".
- Select "usage", as highlighted.
- Click on "Add/Change" to give user "tijs" the "usage" right to your schema. A new line will appear in the list.
- Finally, click on "Ok" to store the new rights.
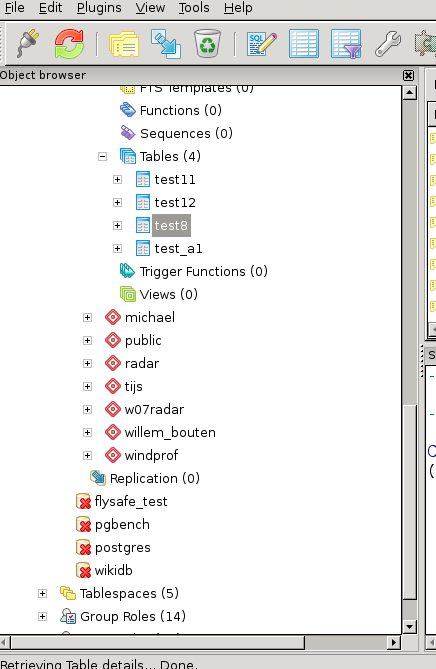
Now that you have given access rights to your schema, other users can see the contents of your schema, but they cannot yet access tables. To give another user access to a table, unfold your schema and unfold the "tables" item in the tree. This will look like the following figure; all tables you upload will appear in this schema. In this example "test8" is a table that must be shared with other users.
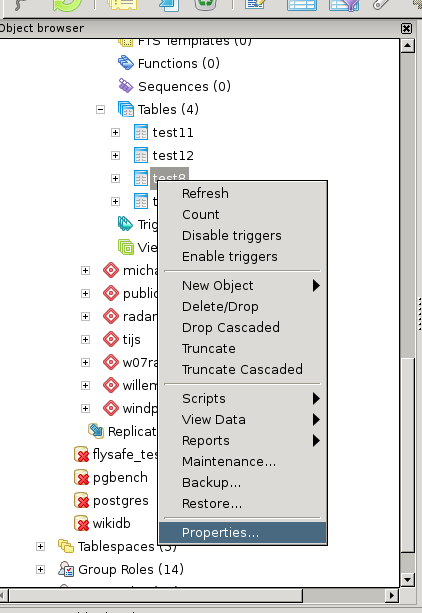
Right-click on the table that you want to share with other users.
A menu will pop-up as shown in the following figure; in this
example the table "test8" was right-clicked.
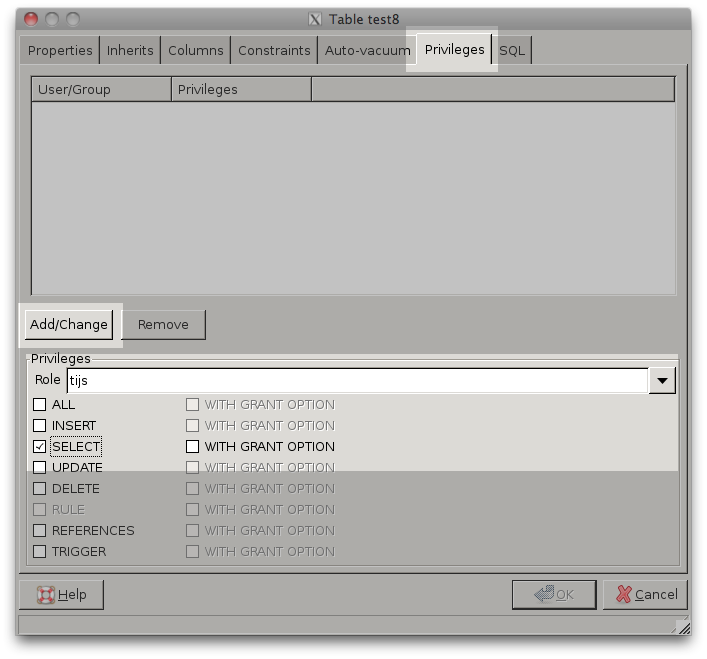
From the popup menu, select "Properties". A window like the one below will be shown with various options for the selected table.
- Select the tab "privileges"
- In the "role" field, select the user you want to share the table with; note: if you see only groups and no users, you have to change your PgadminIII preferences; this is described in showing login roles.
- Select the privileges you want to give this user on this table. To read a table, a user must have the "SELECT" privilege; to change contents, the user must also have the "UPDATE" privilege.
- Click the "Add/Change" button. The user with all privileges will appear in the small window on the top.
- Click "Ok" to save the changes and close the window, or repeat the process to share the table with more users.
In the example above, the table "test8" is shared with user "tijs", who will be able to read the table ("SELECT"), but not update the table ("UPDATE" is not checked).
